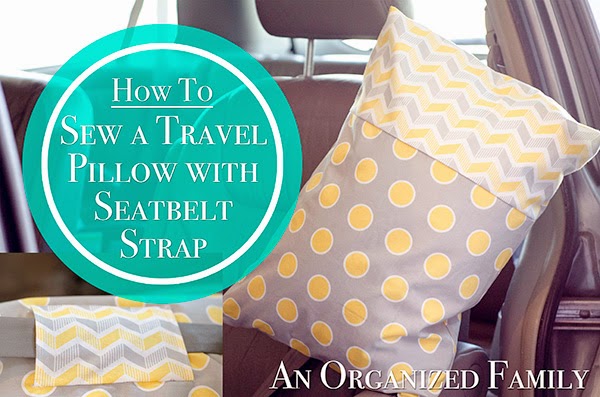
My family takes many road trips and with 5 kids, space is a premium! Every kid wants to be comfortable and be able to rest/sleep with their favorite pillow. But, full size pillows take up a lot of room. It's also hard for the kids (especially the one stuck in the middle) to find a place to put their pillow to rest their head. So, before our next road trip, I decided to make the kids each their own pillow case for a travel size pillow and add a cute little strap on the back so it can be attached to the seatbelt. Rather than make a simple pillow case that is open on the end, I decided to make an envelope style so that the pillow won't slip out.
Supplies Needed:
- 1/2 yard of main fabric
- 1/2 yard of trim/accent fabric
- 6" velcro
- Thread
- Traditional sewing supplies & machine (a serger is also helpful but not necessary)
- 14x20 Travel Pillow
Directions:
1. Wash, dry, and iron your fabric before starting
2. Cut the main fabric to 34" x 16"
Cut the accent fabric to 12" x 16"
Cut the accent fabric to 7" x 5"
Note: Make sure fabric patterns are going the direction you want them to if they are not uniform.

3. Sew a 1/2" hem on one of the 16" sides of both the main fabric and accent fabrics.
a. Turn fabric down 1/2" and iron
b. Turn down fabric again and iron
c. Sew along edge.

These will be your finished edges.

4. Pin right sides together along the 16" raw edges and either serge or sew. This creates one long piece.

Iron seam to one side.

5. Take your strap piece and iron a very small hem on both sides. Fold over and iron again. Then sew along edge.

6. Serge along raw edges or you can sew finished edges on all 4 sides. Fold over edge and iron so that it won't show.

7. Put your velcro (both sides) along one of the serged edges and mark where it needs to be cut (if it needs it). Remove the rough side and sew the softer side to the strap piece.

8. Measure 6" down from the finished edge and 8" (or the middle) from the side and make a marking to position your strap.

9. Place your strap piece down in the middle (as shown below). Carefully open it from the opposite side of the velcro and pin. Sew along edge of non velcro side to hold strap in place.

10. Put the velcro pieces back together so you can find the placement for the bottom piece. You can peel back the top piece as you secure the bottom velcro piece with your sewing machine.

11. Lay out the pillow case, right sides together folding the accent fabric over the top of the main fabric. The main fabric should be 19". The accent fabric should overlap it by about 5". You may need to adjust the length, but they should overlap and should not be longer than 19" total in order to fit the pillow correctly.

12. Pin the sides together and use either a serger or your sewing machine to sew the sides.

You are DONE! You can now turn it right side out and admire your beautiful work!

So far, I have made three pillows (one for each of my girls) and plan to make 3 more. They strap on to the seatbelt great and my kids can't wait to use them on our next road trip!

Have any problems or questions? Feel free to leave a comment below and I am happy to answer them! Happy sewing and road tripping!

It feels relaxing and comfortable to use a travel pillow.
ReplyDeleteI'm stuck at the strap and where to place it
ReplyDeleteThanks for sharing nice information about air cushion travel pillow with us. i glad to read this post.
ReplyDelete